Setting up a rudimentary homelab

This post contains all information regarding my homelab’s configuration – currently a single RPi 4 running DietPi.
Raspberry Pi setup
OS installation
The RPi runs DietPi.
What is Dietpi ?
DietPi is a fleshed-out Debian distro, optimized for all types of RPi’s and providing plenty of utility software to install/manage common softwares.
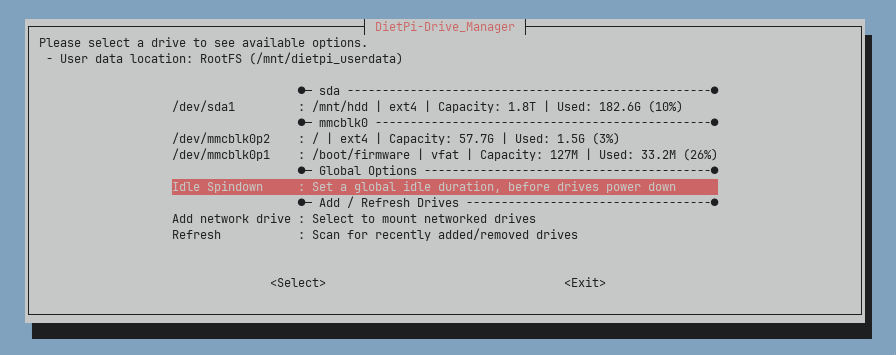
Attach external drive
I find it useful to extend my RPi’s storage by plugging-in an external HDD. To enable it to mount on boot:
-
Plug your HDD (or any drive) into the RPi, and modify
/etc/fstabto add the following entry at the file’s end, automounting the drive on boot.fstabentry to automount the driveUUID=<UUID> /mnt/hdd ext4 noatime,lazytime,rw,noauto,x-systemd.automount # noatime: Disable access time logging, to reduce unnecessary write operations # lazytime: Delay updating a file's modify/change times, # updating them in batch after a wait period # rw: Read & Write access # noauto: Tell the RPi NOT to mount at boot time, # to avoid a "cannot-boot-because-drive-is-missing" situation # x-systemd.automount: Automount ONLY the first time someone tries to access the driveFigure out your drive’s UUID
Run
sudo blkidto list all block devices’ IDs, and figure out your newly-plugged-in drive’s UUID. -
Tell DietPi to spin down the HDD after 5min without use, to save power, reduce wear, and lower noise. This is done by running
dietpi-drive_manager, and thenIdle Spindown > 5 minutes.
Services
Pi-hole
Pi-hole is a DNS sinkhole protecting my devices from unwanted content by refusing to resolve (some) DNS queries, typically of ad-serving domain names.
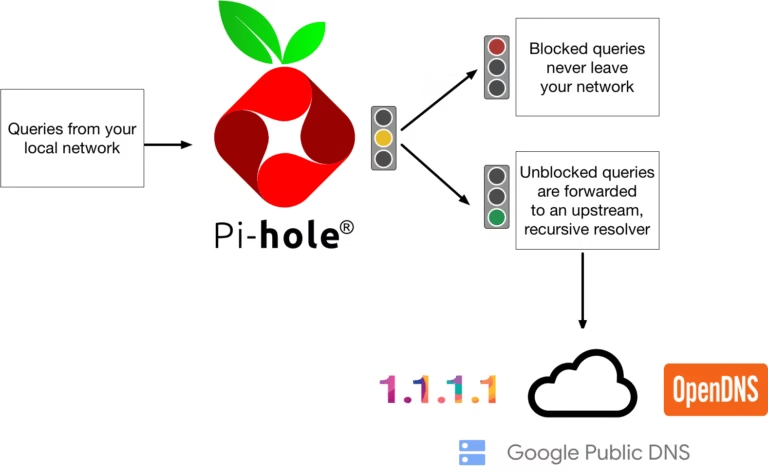
Why would I use a DNS sinkhole?
This is useful because it acts as a network-wide ad-blocker, and prevents all hosts to query known-bad domains (e.g. hidden.chinese.tracking.com).
It also gives me a nice dashboard of what client is pinging what.
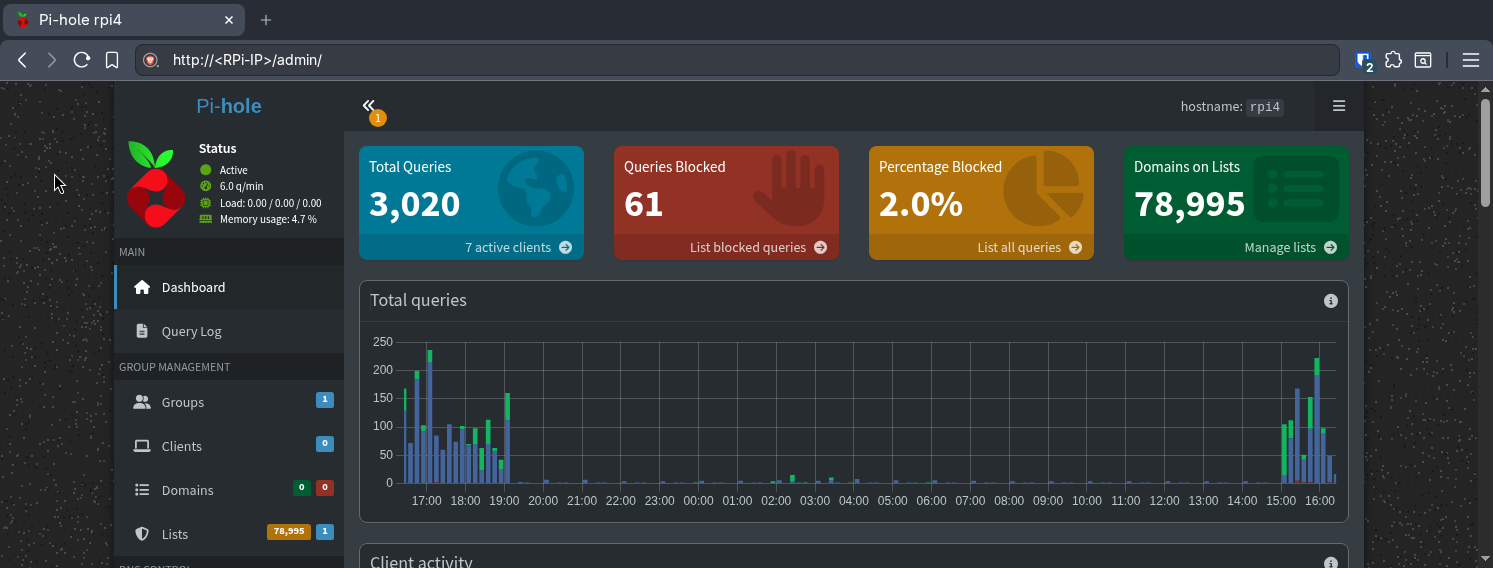
Installation
Follow this DietPi installation guide.
Unbound
Unbound is a validating, recursive, caching DNS resolver.

- Validating: Relying on DNSSEC, it checks that the received IP (for a queried domain name) hasn’t been tampered with, protecting against DNS cache poisoning.
- Recursive: Perform the series of queries (Root server -> TLD server -> Authoritative) on the client’s behalf.
- Caching: Caching the domain name -> IP mapping for faster resolve time (acting as a local DNS)
Why would I self-host my recursive DNS resolver?
This is useful because the alternative is to directly ask a public recursive DNS resolver (e.g. Google’s 8.8.8.8), which means telling some external entity your fully-qualified domain name (FQDN) (e.g. some.website.i.am.ashame.of.com)
Tell your DNS sinkhole to use your self-hosted recursive DNS resolver!
Do not forget to tell Pi-hole to use the locally-running unbound service as recursive DNS server.
Installation
Follow this DietPi installation guide.
File Browser
File Browser provides a file managing interface, serving locally-stored files (in any specified folder) over the network. I use it to serve my USB3.0-hooked HDD.
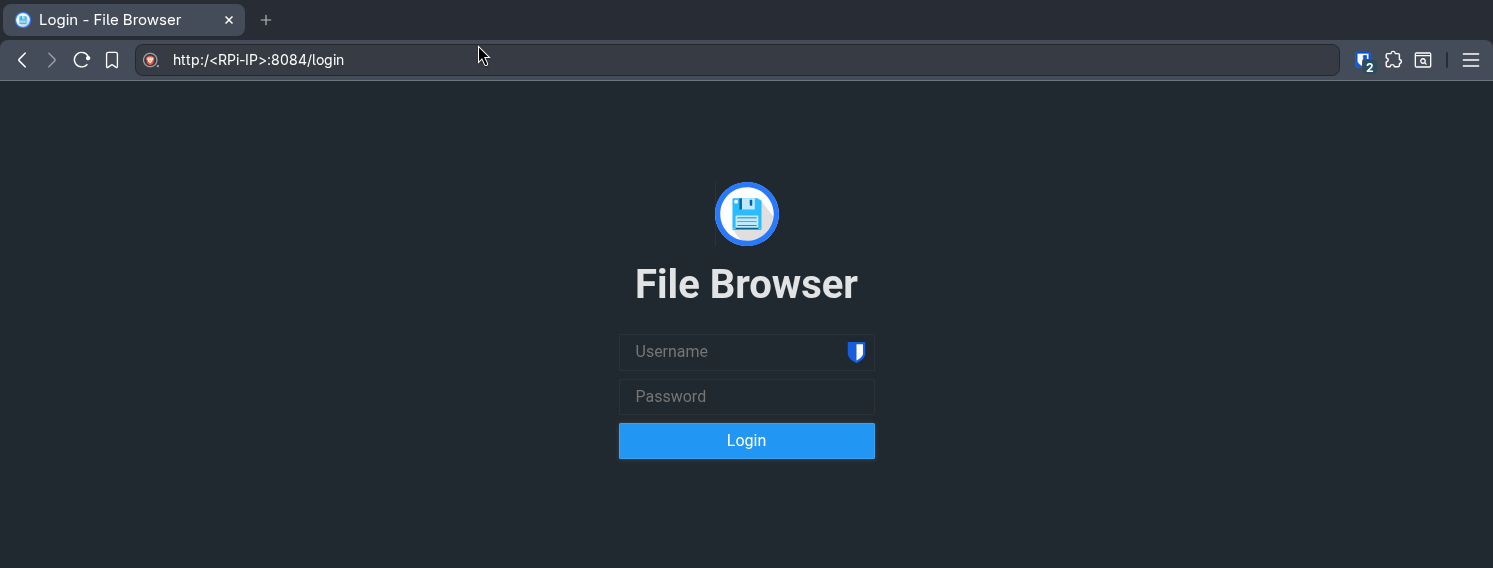
How to only share a subfolder of my RPi’s filesystem?
Via File Browser’s GUI (accessible through http://<RPI-IP>:8084), create one user (SOMEUSER) seeing only /mnt/hdd/SOMEUSER.
Then, on the RPi, the filebrowser user needs to own /mnt/hdd/SOMEUSER.
You can then login with your newly-created File Browser credentials, and try to create a file.
If it works, you’re good to go !
Installation
Install File Browser by following this DietPi installation guide.
Backup via SFTP
Secure File Transfer Protocol (SFTP) is an SSH-enabled way to transfer files from/to my RPi.
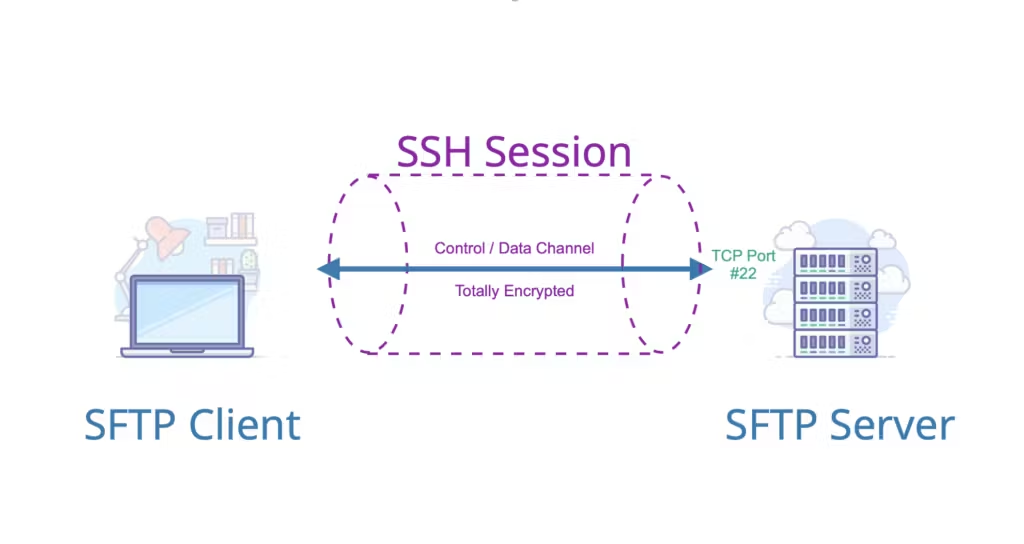
With port 22 open, I can backup my /home/MYUSERNAME folder with restic by running
Important
The above command assumes that
- you have a
dietpientry in your.ssh/config, e.g. - the
/mnt/hdd/SOMEFOLDER/restic-repopath exists on the RPi, and contains a restic repository - the
dietpiuser (or whichever user the.ssh/config’s dietpi entry points to) needs to own therestic-repofolder
Tip
For convenience, I can also setup my main computer to automount a folder (e.g. /mnt/hdd/SOMEFOLDER) via SFTP.
I do this via two systemd units: mnt-SOMEFOLDER.mount and mnt-SOMEFOLDER.automount.
mnt-SOMEFOLDER.mount: How to mount RPi's mnt/hdd/SOMEFOLDER folder[Unit]
Description=Mount unit for SFTP
After=network-online.target
[Mount]
What=dietpi@<RPi-IP>:/mnt/hdd/SOMEFOLDER
Where=/mnt/SOMEFOLDER
Type=fuse.sshfs
# - allow_other: lets non-root users access the mount
# - uid,gid: pretend the folder is owned by this uid:gid, allowing write
# - reconnect: handles network drops
Options=allow_other,IdentityFile=/home/SOMEUSERNAME/.ssh/dietpi-access,UserKnownHostsFile=/home/SOMEUSERNAME/.ssh/known_hosts,reconnect,ServerAliveInterval=15,ServerAliveCountMax=3,default_permissions,uid=1000,gid=1000
[Install]
WantedBy=multi-user.target
mnt-SOMEFOLDER.automount: How to automount RPi's mnt/hdd/SOMEFOLDER folder when my computer tries to access it[Unit]
Description=Automount unit for SOMEFOLDER SFTP
After=network-online.target
[Automount]
Where=/mnt/SOMEFOLDER
# Unmount if idle for 5 minutes
TimeoutIdleSec=300
[Install]
WantedBy=multi-user.target
- Copy both
.mountand.automountfiles to your main computer’s/etc/systemd/system/folder - Enable the newly-created
systemdautomount unitsystemdcommands to setup drive automount# Make systemd aware of the newly-created units sudo systemctl daemon-reload # Enable the automount unit, which takes care of the mount unit sudo systemctl enable --now mnt-SOMEFOLDER.automount # To ensure this worked sudo systemctl status mnt-SOMEFOLDER.mount - You should now be able to access
/mnt/SOMEFOLDERon your main computer
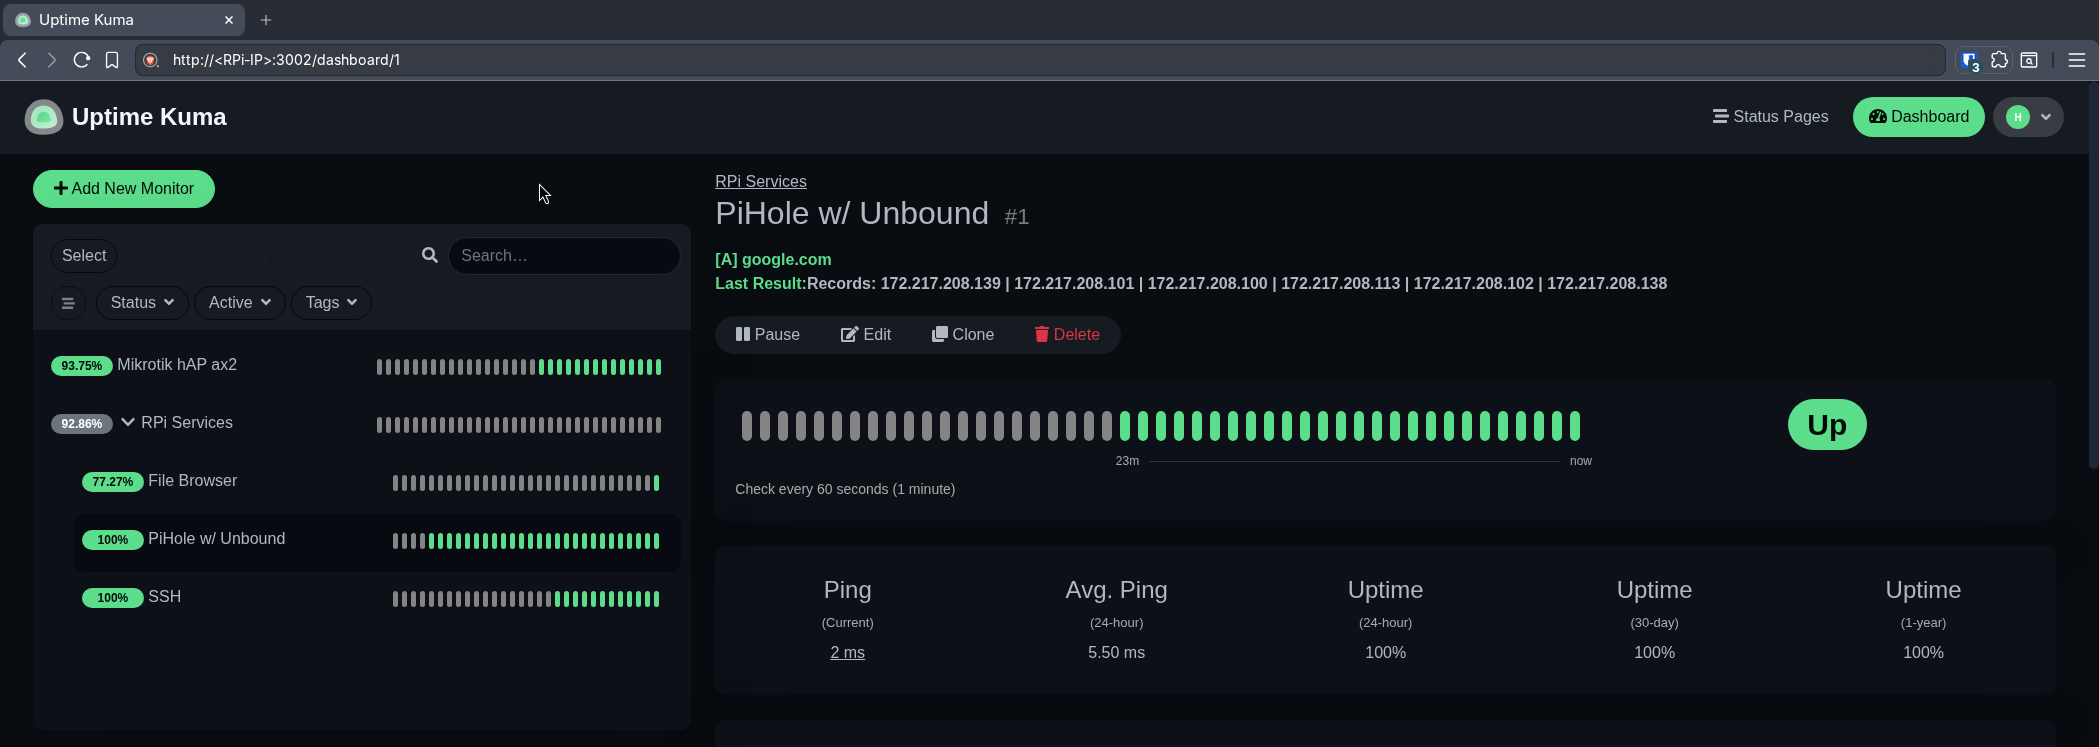
Uptime Kuma
To get an overview of all my services, and know what’s currently up/down, Uptime Kuma gives me a dashboard with the ability to set periodic uptime-checks.
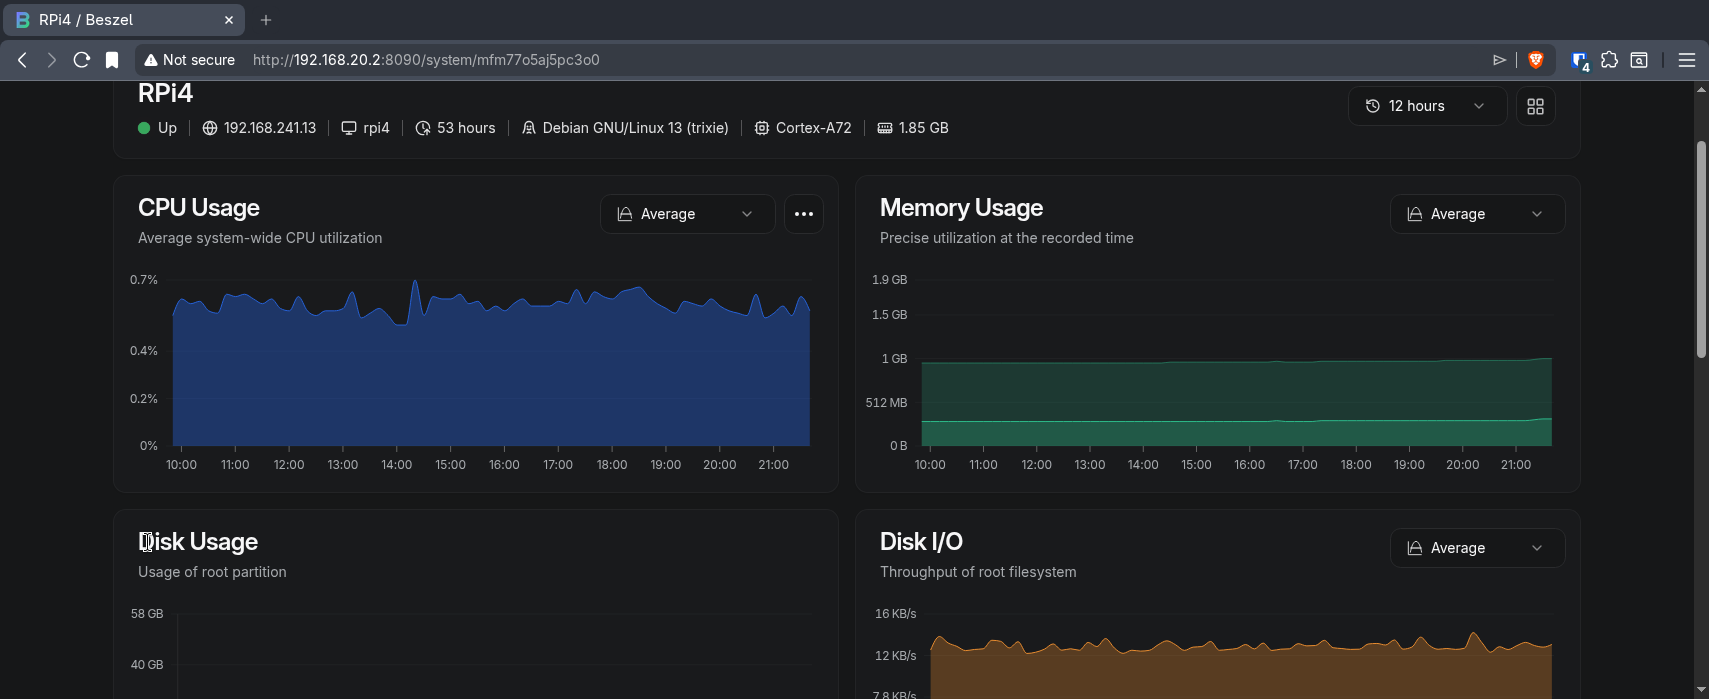
Beszel
To get an overview of my RPi’s health (CPU/RAM usage, disk accesses, …) Beszel – although overkill – gives me a dashboard centralizing system heath.